
What if that gleaming cowling is merely a mask for a cooling system choked with salt or a fuel system degraded by ethanol? Buying a pre-owned motor often feels like a high-stakes gamble where the risk of hidden corrosion or falsified engine hours weighs heavily on your mind. It is natural to feel anxious about inherited repair costs, but you don’t have to rely on luck. By using a professional outboard engine inspection checklist, you can peel back the layers of a motor’s history and recognise exactly what you are paying for.
We understand that your boat is more than just a vessel; it is an investment in your lifestyle and safety. This article promises to help you master the technical art of evaluating used marine motors for 2026, whilst ensuring you can analyse the difference between a genuine bargain and a mechanical liability. We will guide you through a structured framework covering physical wear, cooling efficiency, and the latest digital diagnostics. You will gain the clarity to negotiate with authority and the peace of mind that comes from knowing your engine is ready for years of reliable performance on the water.
Key Takeaways
- Understand why a rigorous mechanical audit is essential for risk mitigation, as cosmetic condition often masks underlying structural fatigue.
- Utilise our comprehensive outboard engine inspection checklist to perform a methodical “top-to-bottom” scan of the entire motor assembly.
- Learn to interpret internal health by evaluating fluid consistency and spark plug condition to identify potential water ingress or combustion issues.
- Discover how to conduct effective operational trials, including cold starts and cooling system pressure checks, to ensure reliable performance.
- Finalise your investment with confidence by cross-referencing serial numbers for legal compliance and establishing a maintenance baseline with a certified mechanic.
Buying Used Outboard Engines for Sale: Why a Rigorous Inspection is Vital
Acquiring a pre-owned motor is a significant financial commitment that requires a disciplined approach. You should view a “used engine audit” as a vital risk-mitigation strategy for your high-value marine assets. Whilst a fresh coat of paint and new decals might suggest a well-maintained unit, cosmetic appearance is frequently deceptive. It can easily hide structural fatigue or deep-seated mechanical issues that only surface once you are miles from the shore. Understanding Outboard motor basics is the first step in seeing past the surface shine to the mechanical reality beneath.
The primary objective of your outboard engine inspection checklist is to distinguish between “deal-breakers” and “negotiation points”. You aren’t just looking for a perfect engine; you’re looking for an honest one. A deal-breaker is a terminal flaw, such as a cracked engine block or severe internal corrosion, that makes the motor a liability. In contrast, a negotiation point involves manageable wear, like a chipped propeller or a frayed starter rope, which allows you to justify a lower asking price. Always verify the physical condition of the hardware against any provided service history. If the logs say “frequent oil changes” but the dipstick shows sludge, the history is likely a fabrication.
The Financial Logic of Pre-Purchase Inspections
Investing time into a professional inspection is a fraction of the cost of a full powerhead rebuild. If a motor fails because of a hidden flaw you overlooked, the financial fallout can be devastating to your boating season. A detailed checklist provides you with the necessary leverage during price negotiations. By identifying upcoming maintenance needs, you can adjust your offer to reflect the true “total cost of ownership”. This concept includes the purchase price plus the immediate repairs required to bring the motor up to a safe, reliable standard. It’s about protecting your capital and your peace of mind.
Understanding the Saltwater vs. Freshwater Factor
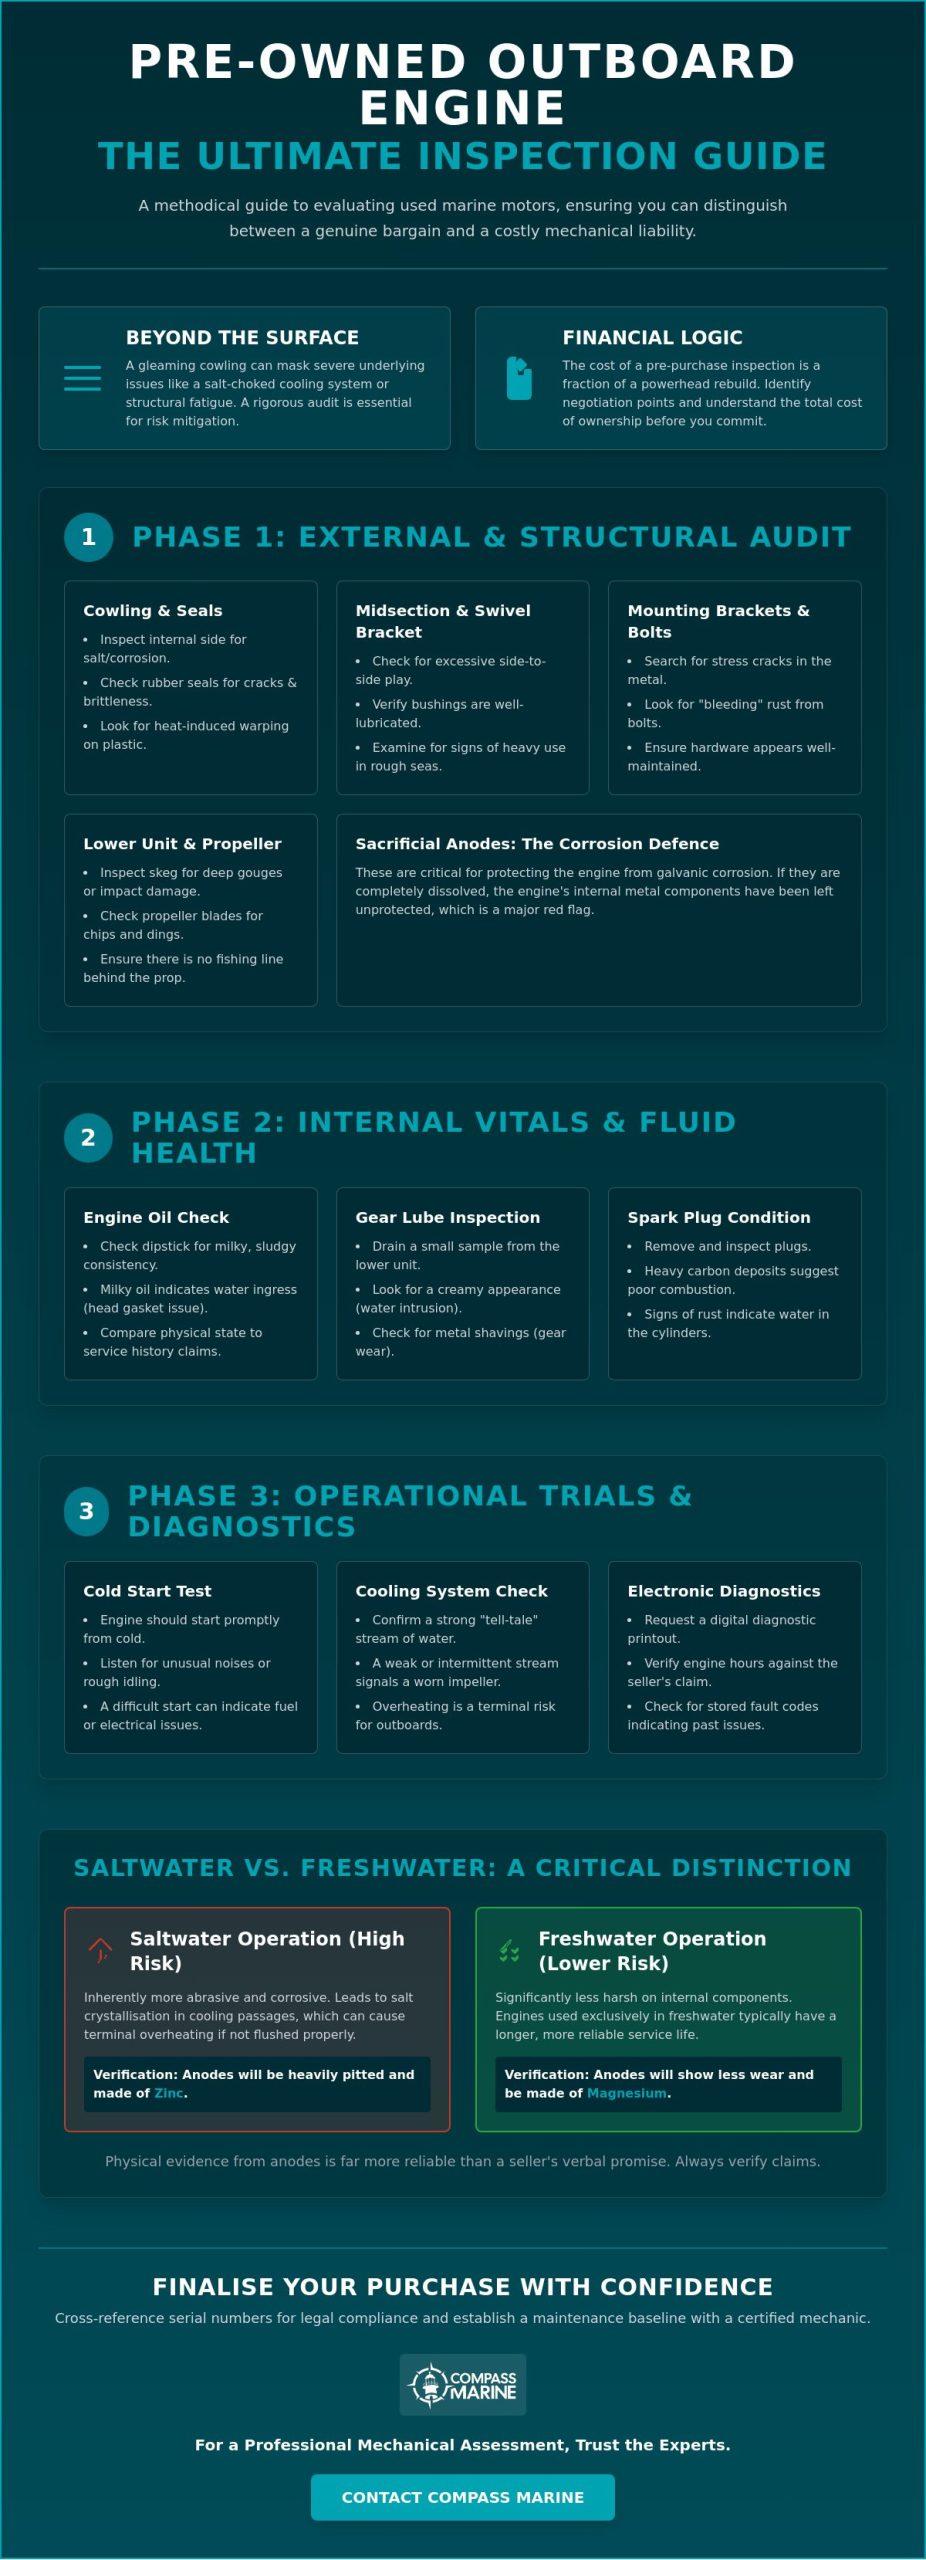
South African coastal conditions, particularly around Durban and the KZN coastline, present unique challenges for marine hardware. Saltwater operation is inherently more abrasive than freshwater use. It leads to salt-crystallisation amongst internal cooling passages which, if left unchecked, causes terminal overheating. Many sellers claim “freshwater use only” to fetch a higher price, but you must physically verify this claim. Check the sacrificial anodes; if they are heavily pitted or have been replaced with zinc instead of magnesium, the engine has likely spent significant time in the sea. This physical evidence is far more reliable than a verbal promise. The same principle applies when evaluating used jet skis for sale, where saltwater corrosion can be equally devastating to a PWC’s internal components.
Phase 1: The External Anatomy and Mechanical Structural Audit
Your physical assessment begins with a systematic top-to-bottom visual scan. This stage of the outboard engine inspection checklist is designed to reveal how the motor was treated by its previous owner. Start by removing the cowling to inspect the internal side of the cover and the rubber seals. These seals should be supple and free from cracks. Brittle rubber or salt crystals amongst the seals suggest that water has been ingressing into the engine tray. Look for signs of heat-induced warping on the plastic components; this often indicates a history of severe overheating that may have compromised the cylinder head gaskets.
Move your attention to the midsection and swivel bracket. Grab the lower unit and attempt to move it side-to-side and front-to-back. There should be minimal play in the bushings. Excessive movement suggests a lack of lubrication or heavy use in rough conditions. Don’t forget to examine the mounting brackets and transom bolts. Look for stress cracks in the metal or “bleeding” rust, which indicates structural fatigue. If the hardware appears neglected, you might want to consider a professional mechanical assessment to ensure the transom isn’t compromised. Verifying the condition of external sacrificial anodes is also vital. If they are completely dissolved, the engine’s internal components have likely been fighting off galvanic corrosion without protection. When assessing the overall condition of a vessel’s metalwork, it is also worth considering whether critical fittings like rails and brackets meet the standard of marine stainless steel fabrication Durban specialists recommend for long-term corrosion resistance in KwaZulu-Natal’s high-salinity coastal environment.
Lower Unit and Propeller Inspection
The lower unit is the most vulnerable part of any motor. Inspect the skeg and leading edges for impact damage. Whilst minor paint chips are common, deep gouges suggest a history of groundings. You should also pull the propeller to check for fishing line wrapped around the shaft. Line can easily melt into the propeller shaft seals, allowing water to enter the gearbox and oil to leak out. Spin the propeller and watch the centre point of the shaft; it must remain perfectly true. A wobbling shaft is a “deal-breaker” that requires an expensive strip-down and repair. This level of detail is a core component of any reputable Used motor buying checklist.
The Tilt and Trim System Check
A failing tilt and trim system is a costly headache you want to avoid. Operate the power trim throughout its full range several times. Listen for any straining, chattering, or intermittent pauses in the motor’s behaviour. The hydraulic rams should be smooth and free from pitting or scoring. If you see “milky” or leaking fluid around the seals, the system is compromised. Finally, ensure the manual release valve isn’t seized. Previous owners often neglect this valve, but you’ll need it to be functional if the electronics ever fail whilst you’re on the water.
Phase 2: Evaluating the Internal Vitals and Fluid Health
Once the external audit is complete, you must transition to the motor’s internal systems. This phase of your outboard engine inspection checklist focuses on the fluids and combustion components that determine day-to-day reliability. Start with the engine oil dipstick. If the oil appears “milky” or resembles a café au lait, it’s a definitive sign of water contamination. This usually indicates a blown head gasket or a cracked block. Conversely, oil that smells burnt or looks jet black in a four-stroke suggests that the engine has been run hard without adequate cooling or regular maintenance.
Next, pull the spark plugs to read the combustion health. Their appearance tells a story of the engine’s internal state. A light tan colour is ideal. Heavy carbon buildup or wet, oily deposits indicate poor combustion or worn piston rings. You should also conduct a compression test whilst the plugs are out. A healthy engine must show consistent pressure across all cylinders, with no more than a 10% variance between the highest and lowest readings. Significant deviations often point to expensive internal repairs that could compromise the vessel’s safety. For a more detailed breakdown of these technical steps, you can refer to this comprehensive inspection checklist.
Don’t overlook the fuel system. Inspect the fuel lines for brittleness or “alligator skin” cracking, which is common with older hoses exposed to ethanol-blended fuels. Check the water separator filter for debris or trapped water. If the filter is full of gunk, it’s likely the entire fuel system, including the injectors or carburettors, will require a professional deep clean before the motor is truly sea-worthy.
The Gearbox Oil Audit
The lower unit gearbox requires a separate investigation. Crack the lower drain screw slightly to allow a small amount of gear lube to escape. You are looking for metallic filings or a silvery sheen; these indicate catastrophic gear tooth failure or bearing wear. Normal wear produces a very fine, almost invisible dust, but actual flakes of metal are a deal-breaker. Be wary if the oil looks brand new. A seller might have performed a fresh oil change right before the sale to hide water ingress or metal debris from a failing gearbox.
Cooling System and Thermostat Inspection
Internal corrosion is the silent killer of marine motors. Remove the thermostat cover to inspect the upper cooling passages. If you find heavy salt blockages or “crustiness” amongst the passages, it suggests the previous owner’s flushing behaviour was negligent. This buildup restricts water flow and leads to hotspots in the cylinder head. Also, check for small bits of black rubber in the thermostat housing. This is a sign of “dry-running,” where the water pump impeller has disintegrated and sent debris throughout the cooling system.
Phase 3: Operational Trials and Electronic Diagnostic Data
Insist on a “cold start” when you first arrive to view the motor. If the cowling feels warm to the touch before you have even turned the key, the seller might be concealing a difficult starting behaviour or a failing battery. A truly reliable motor should fire up promptly from cold without excessive cranking or the need for constant throttle adjustments. Once the engine is idling, monitor the “tell-tale” stream. It should be consistent and strong; a weak or sputtering flow suggests a worn impeller or a blockage in the cooling passages that could lead to a catastrophic overheat. As the engine reaches operating temperature, listen closely for any rhythmic knocking or metallic slapping. These sounds often intensify under load and can signal terminal bearing wear or piston slap.
Modern outboards are essentially floating computers. To get a true picture of an engine’s life, you need to plug in. This is a critical step in your outboard engine inspection checklist that separates a casual buyer from a professional. You should check for excessive smoke during acceleration, which can indicate failing valve seals in a four-stroke or an oil injection malfunction in a two-stroke. If possible, perform a short run at wide-open throttle to ensure the engine reaches its rated RPM range without hesitation. Any “surging” or “flat spots” in the power delivery usually point to fuel delivery issues or failing ignition coils.
Interpreting ECU Diagnostic Reports
A professional Yamaha outboard service diagnostic tool can extract the ECU’s internal history, which is far more accurate than a seller’s word. This report provides an “RPM Map,” showing exactly how many hours the motor spent at wide-open throttle compared to leisurely trolling. It also logs every overheat event and low-oil pressure warning that has ever occurred. If the report shows multiple active fault codes in the electrical system, it’s a sign that the motor’s brain is struggling. You can use this data to negotiate a price that accounts for the engine’s actual wear and tear rather than just its age.
Battery and Charging System Verification
A motor’s mechanical health is only half the story. You must also verify the charging system. Use a multimeter to test the voltage at the battery terminals whilst the engine is running; you should see a healthy increase, typically between 13.5 and 14.5 volts. Inspect the wiring harness for any corroded terminal ends or messy “aftermarket” splices. Poor marine electronics installation can lead to parasitic draws that flatten your batteries at the worst possible moment. If you’re unsure about interpreting these technical readings, our team provides expert diagnostic support for used outboard purchases to give you total confidence in your investment.
Finalising the Purchase: Compliance, Servicing, and Peace of Mind
Once you have completed your outboard engine inspection checklist and agreed on a price, the focus shifts to legal and mechanical security. You must verify the serial numbers on the engine bracket against the official registration documents before any money changes hands. In South Africa, mismatched numbers aren’t just a clerical error; they often indicate stolen property or an unauthorised import. Such discrepancies will prevent you from securing insurance or obtaining a legal Certificate of Fitness. Ensuring the paperwork is as clean as the mechanical components is the final hurdle in protecting your capital and your reputation on the water.
We believe that a professional maritime partner serves as the ultimate safeguard in your buying journey. Even if the motor passes your initial tests, it is vital to establish a maintenance “baseline” immediately after purchase. This involves a comprehensive service by a certified technician to replace the water pump impeller, thermostats, and all internal anodes. Starting your ownership with a fresh service history provides the peace of mind that every component is operating at peak efficiency, regardless of what the previous owner claimed.
South African Maritime Compliance Requirements
Repowering a vessel is a significant modification that carries legal weight. When you install a different engine, your existing buoyancy certificates may become invalid, particularly if the new motor’s weight or horsepower differs from the original specification. You are legally required to have a revised COF (Certificate of Fitness) survey conducted to ensure the vessel remains seaworthy with the new power configuration. Additionally, moving to a higher horsepower engine might trigger a need for upgraded safety equipment, such as larger fire extinguishers or specific battery isolation switches, to remain compliant with SAMSA regulations.
The Role of Certified Yamaha and Suzuki Mechanics
Trusting a “safe pair of hands” for the final mechanical sign-off is the smartest move a buyer can make. Our certified mechanics possess the institutional knowledge to spot subtle wear patterns that an untrained eye might miss. We encourage all buyers to visit a marine technical services centre for a full electronic audit and physical inspection. This professional intervention ensures that your investment is protected by technical mastery and integrity.
Don’t leave your maritime safety to chance or guesswork. Contact Compass Marine for professional engine servicing and pre-purchase inspections to ensure your next outboard motor delivers years of unwavering reliability.
Securing Your Future on the Water
You now possess the technical framework required to evaluate a pre-owned motor with the precision of a seasoned mariner. By following this structured outboard engine inspection checklist, you have moved from a state of technical uncertainty to one of informed confidence. You understand that a motor’s true history is found within its fluid health and electronic diagnostic data rather than its outward cosmetic appearance. Protecting your investment means looking past the polish to ensure every mechanical component is fit for the challenges of the sea.
The final step in your journey is ensuring total peace of mind through professional verification. Our team of certified Yamaha and Suzuki technicians provides the “safe pair of hands” you need for a definitive mechanical sign-off. We offer comprehensive ECU diagnostic capabilities to uncover hidden engine histories and provide full facilitation for COF and buoyancy certification. This ensures your vessel is both reliable and legally compliant before you leave the harbour.
Don’t leave your safety to chance. Book a Professional Pre-Purchase Inspection at Compass Marine and ensure your investment delivers years of unwavering performance. We look forward to helping you launch with complete confidence.
Frequently Asked Questions
Is it worth buying used outboard engines for sale instead of new ones?
Buying a pre-owned motor is a highly effective way to reduce the total cost of boat ownership. You can often save a substantial percentage of the price of a new unit, which frees up capital for high-end fish finders or safety equipment. The value is only realised, however, if you perform a rigorous technical audit to ensure the motor hasn’t been neglected or abused in saltwater conditions.
What are the most common “deal-breakers” when inspecting a used boat motor?
Terminal deal-breakers include cracked engine blocks, severe internal corrosion amongst the cooling passages, and evidence of previous submersion. You should also walk away if there is more than a 10% variance in compression between cylinders or if the propeller shaft is visibly bent. These issues usually require repairs that exceed the engine’s market value, making them poor investments for any mariner.
How many hours is too many for a used 4-stroke outboard engine?
Modern four-stroke engines can easily exceed 2,000 to 3,000 hours if they have been maintained with professional care. For most recreational buyers, an engine with fewer than 500 hours is considered a low-use find. It’s more important to look at how those hours were spent; 100 hours of wide-open throttle is far more taxing than 500 hours of leisurely trolling.
Can I perform a compression test myself, or do I need a professional?
Whilst you can buy a basic gauge and perform a test yourself, a professional provides a far more accurate diagnosis. A certified mechanic will use a comprehensive outboard engine inspection checklist to interpret the results alongside a leak-down test. This determines if pressure loss is caused by worn piston rings, failing valves, or a compromised head gasket, giving you a complete picture of the motor’s health.
What does milky gear oil actually mean for the health of the engine?
Milky gear oil is a definitive sign of water contamination within the lower unit gearbox. This usually happens because the propeller shaft seals have been compromised by discarded fishing line or the drain screw gaskets have perished. If you don’t address this immediately, the water will cause the internal gears and bearings to rust, eventually leading to a terminal mechanical failure whilst you’re on the water.
Does a used engine purchase require a new buoyancy certificate?
Yes, any change to your vessel’s power configuration requires a revised buoyancy certificate and a new COF survey. South African maritime regulations are strict regarding weight and horsepower limits for specific hulls. If your new motor is heavier or more powerful than the original, it can alter the boat’s behaviour and safety profile, making your existing documentation invalid and potentially voiding your insurance.
How can I verify the actual year of manufacture on a used outboard?
You must cross-reference the model and serial number found on the transom bracket plate with the manufacturer’s official year-model charts. Don’t rely solely on the date the boat was first registered or the seller’s verbal claims. It’s common for engines to sit in a showroom for a year or two before being sold, so the mechanical age may differ from the date of first use.
What is the best way to flush a used engine that has been sitting for months?
Use a high-quality set of “ear muffs” or the dedicated flushing port with fresh water and a salt-neutralising solution. Start the engine with low water pressure and monitor the tell-tale stream closely for any debris or salt flakes that might be dislodged. If the engine hasn’t been run for a long period, it’s wise to replace the water pump impeller before your first trip to prevent a sudden cooling failure. If you are also considering other pre-owned watercraft, our guide to used jet skis for sale and their pre-purchase inspection requirements covers many of the same flushing and corrosion checks in the context of personal watercraft.