
Your boat’s electrical system rarely fails because of a manufacturing defect; it usually fails because the Indian Ocean is trying to reclaim your connections. In the relentless humidity and salt spray of the KwaZulu-Natal coast, even the most robust wiring is under constant pressure from corrosion and hull vibration. It is a frustrating reality that often leads to intermittent failures or the dreaded dead battery just as you are preparing to head out of the harbour.
We know that staring at a complex web of wires can feel overwhelming, especially when the safety of your passengers is on the line. This guide simplifies marine electrical fault finding, giving you the practical knowledge to identify, diagnose, and resolve common issues before they leave you stranded. You will learn how to perform safe DIY diagnostic steps, understand the reasoning behind system failures, and recognise exactly when professional intervention is required to keep your vessel reliable and compliant with South African safety standards. By following this methodical approach, you can move from a state of concern to a state of total confidence in your vessel’s reliability.
Key Takeaways
- Understand how the specific coastal conditions in KwaZulu-Natal, such as high humidity and salt spray, accelerate terminal corrosion and lead to intermittent power loss.
- Master a logical approach to marine electrical fault finding by prioritising safe isolation and conducting thorough visual inspections at the battery and helm.
- Learn the practical benefits of using marine-grade tinned wire and dielectric grease to ensure long-term reliability in the harsh South African marine environment.
- Recognise the critical signs that indicate an electrical fault requires professional intervention, especially when dealing with complex NMEA 2000 networks or high-current circuits.
- Discover how proactive electrical maintenance supports your vessel’s overall safety and helps streamline the process for your annual SAMSA COF survey.
Understanding the Marine Electrical Environment
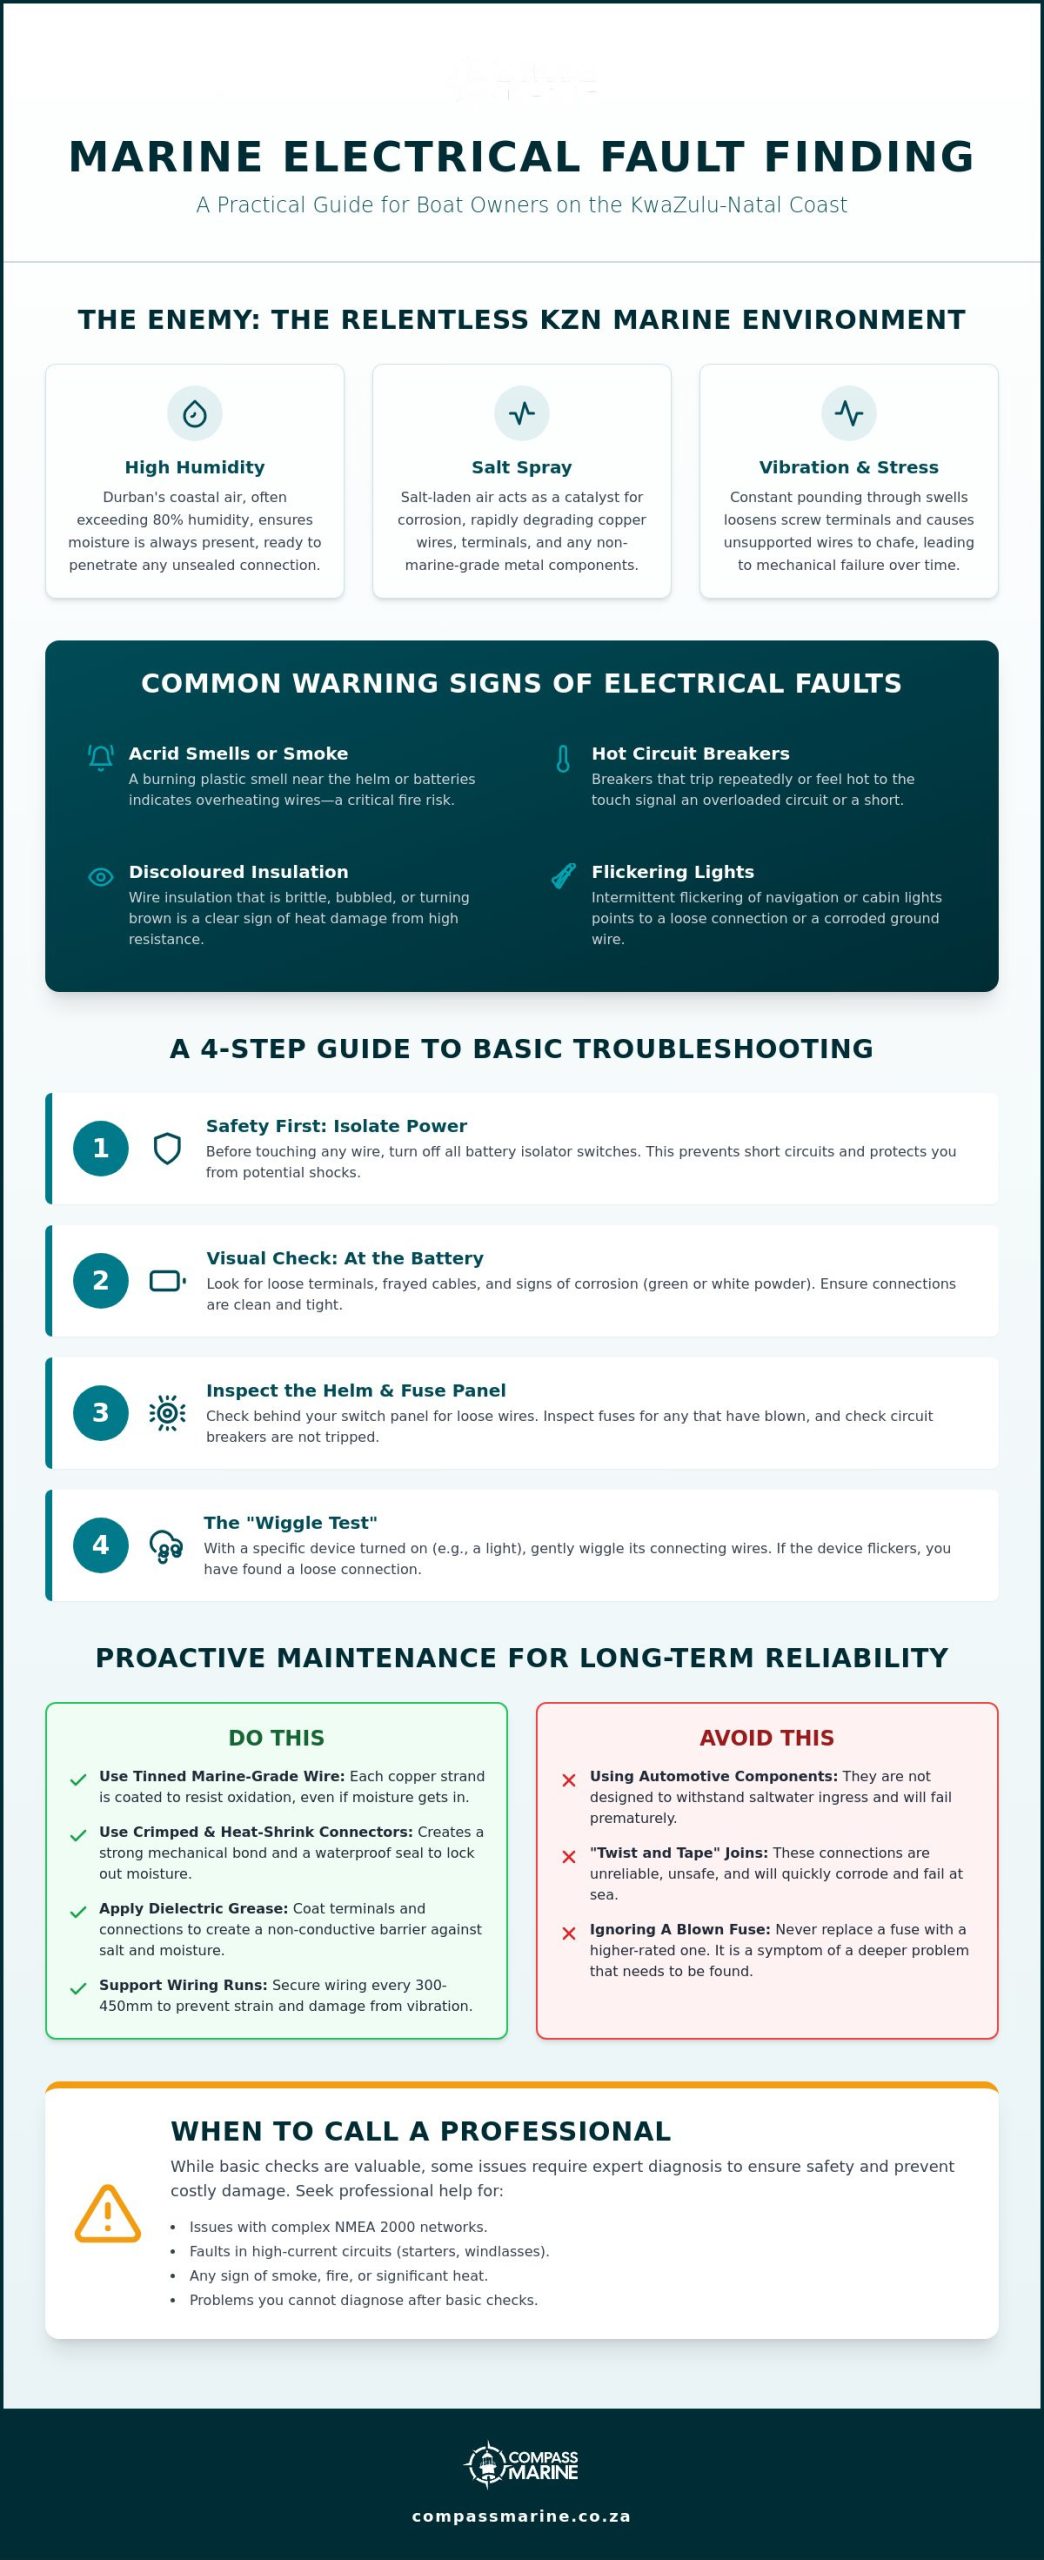
The Indian Ocean is a notoriously aggressive environment for any metal, but it is particularly brutal on electrical systems. In Durban, we deal with high ambient humidity that frequently exceeds 80 per cent, coupled with salt-laden air that penetrates every crevice of a vessel. Unlike a land-based vehicle, a boat is essentially a floating chemical laboratory where moisture, salt, and electricity combine to degrade connections. This environment makes marine electrical fault finding a necessary skill for every owner, rather than a luxury.
Automotive components are designed for dry engine bays and relatively stable environments. When these parts are installed on a boat, they fail rapidly because they lack the specific protections required to resist saltwater ingress. Marine-grade hardware is built to survive these conditions, often featuring sealed housings and corrosion-resistant materials that can withstand the unique challenges of the KZN coastline.
The Chemistry of Corrosion
When you peel back the insulation on an old wire and see a powdery green substance, you are looking at verdigris. This copper carbonate layer is a poor conductor of electricity; it creates resistance, which generates heat and eventually causes the circuit to fail. Moisture often enters through a poorly sealed end and moves up the strand through capillary action, wicking saltwater centimetres deep into the cable where you cannot see it. This hidden degradation is a primary target during marine electrical fault finding procedures. Galvanic corrosion is an electrochemical process where one metal corrodes preferentially when it is in electrical contact with another, dissimilar metal in the presence of an electrolyte like saltwater.
Vibration and Mechanical Stress
A boat hull pounding through the swells off the North Coast experiences significant G-forces. These constant vibrations act on every wiring harness, slowly loosening screw terminals and fatiguing metal connectors. If your wiring is not properly supported at regular intervals, typically every 300mm to 450mm, the weight of the loom itself can pull connections apart or cause the insulation to chafe against the hull.
Using tinned copper wire is non-negotiable for longevity. The individual tin coating on each strand prevents the copper from oxidising, ensuring the core remains conductive even if moisture reaches it. You should also avoid “twist and tape” joins at all costs. These temporary fixes are a recipe for disaster at sea because they cannot withstand the mechanical stress or the moisture levels found in marine electronics systems. Professional installations rely on crimped, heat-shrink connectors that provide both a mechanical bond and a watertight seal, ensuring your safety when you are far from the harbour.
Identifying Common Symptoms of Electrical Faults
Identifying a problem early often prevents a minor annoyance from becoming a safety hazard. While marine electrical fault finding eventually requires tools like multimeters, the first clues are usually sensory. You don’t need to be an expert to recognise when a system is struggling; you simply need to know what to look for during your pre-launch checks or whilst out on the water. Common physical warning signs include:
- Acrid smells or visible smoke near the helm station or battery box.
- Circuit breakers that trip repeatedly or feel hot to the touch.
- Discoloured, brittle, or “bubbling” wire insulation.
- Intermittent flickering of LED navigation lights or cabin fittings.
Electronic “noise” is another frequent indicator of underlying trouble. If your VHF radio crackles only when the engine is running, or if your sonar screen shows vertical lines when you activate a bait pump, you are likely dealing with electromagnetic interference. This often stems from poor shielding or shared ground wires that haven’t been properly isolated. Whilst South African boaters focus on local seaworthiness, many global manufacturers adhere to U.S. Coast Guard electrical regulations regarding ignition protection and wire sizing to ensure these symptoms don’t escalate into a fire risk.
Power Supply Issues
Differentiating between a genuine dead battery and a parasitic drain is a vital step. A parasitic drain occurs when a device, such as a stereo memory wire or a faulty bilge switch, continues to draw current whilst the master switch is off. Over a week in the Durban harbour, this will flatten even a brand-new battery.
The “slow crank” is another classic symptom. You turn the key and the engine groans, yet your voltmeter shows a healthy 12.6V. This is rarely a battery failure; it is usually a high-resistance connection caused by corrosion. Voltage drop is a similar thief; if your lights dim significantly when a pump kicks in, your wiring is likely undersized or the connections are degraded, creating a bottleneck that starves your equipment of power.
Instrument and Accessory Failures
Modern fish finders are incredibly sensitive to voltage fluctuations. Because they are essentially sophisticated computers, they may reboot or freeze if the voltage dips even momentarily below 10.5V. If your electronics act erratically when you start your engines, it is a primary indicator that your house battery bank or its charging circuit requires attention.
Automated bilge pumps and tank sender units are equally prone to failure in our humid KZN climate. If a pump runs but moves no water, or if a fuel gauge needle fluctuates wildly, the issue is often a corroded ground connection or a blown fuse hidden within a secondary loom. If these symptoms persist, seeking professional electrical wiring and fault diagnostics can prevent a total system failure when you are far from the coast.
A Step-by-Step Guide to Basic Electrical Troubleshooting
Effective troubleshooting begins with a commitment to safety. Before you open a battery box or reach behind a helm station, you must isolate the system to prevent accidental short circuits or electrical shocks. Ensure that all shore power cables are physically disconnected and that your main battery selector switches are turned to the “off” position. This simple precaution protects both you and your expensive onboard equipment from unexpected surges during the marine electrical fault finding process.
Once the system is safe, you can begin a logical investigation. Most electrical failures on boats aren’t caused by complex internal component meltdowns but by simple mechanical failures at connection points. By following a methodical path from the power source to the individual appliance, you can usually identify the culprit without needing an engineering degree. If the problem persists after these basic checks, it may indicate a deeper issue within your electrical wiring and fault diagnostics that requires professional attention.
The Visual Audit
Your eyes are often more useful than a multimeter in the initial stages. Start your inspection at the battery terminals. A frequent mistake amongst South African boaters is the use of wing nuts to secure heavy-gauge cables. These are notorious for vibrating loose during a rough run back from the fishing grounds; replace them with stainless steel hex nuts and lock washers for a permanent, high-torque connection.
Examine your fuse panel or circuit breaker board. Look for signs of “tracking” or arcing, which appear as thin black lines or melted plastic around a terminal. These indicate a loose connection that is generating excessive heat. Do not overlook the ground side of the circuit. Ensure the heavy negative cables attached to your engine block are free from grease and salt crust, as a poor ground is the primary cause of intermittent instrument failure.
Basic Multimeter Skills
A digital multimeter is the only specialised tool you truly need. To check your system’s health, set the device to the DC Voltage range, typically marked with a solid line over a capital ‘V’. A healthy, fully charged lead-acid battery should show approximately 12.6V at rest. If your reading shows 12.2V, your battery is actually at 50 per cent capacity and may not have enough energy to crank the engine or support electronics under load.
Continuity testing is the most efficient way to find a “break” in a wire that looks fine from the outside. To perform a continuity test on a marine fuse, set your multimeter to the audible beep or ‘omega’ setting and touch the probes to both ends of the fuse to confirm a complete electrical path exists. Professionals who hold an ABYC Marine Electrical Certification use these fundamental tests to rule out simple failures before moving on to complex network diagnostics. Often, the solution is as simple as cleaning a terminal with a wire brush and applying a fresh coat of terminal protector.
Advanced Diagnostics: When Professional Intervention is Required
Whilst basic troubleshooting can resolve many minor issues, certain systems on your vessel demand a level of expertise that goes beyond a standard multimeter. High-current starter circuits, for example, carry hundreds of amps of electricity. A loose connection or an incorrect repair in these areas doesn’t just cause a failure; it creates a significant risk of fire or battery explosion. When marine electrical fault finding leads you into the heavy-gauge cabling of your engine’s starting system, the stakes for your safety and your investment become much higher.
Modern vessels also rely on complex NMEA 2000 data networks to share information between GPS units, autopilots, and engine sensors. These are not simple power circuits; they are sophisticated digital communication buses. Troubleshooting a “ghost” in the data stream often requires protocol analysers and an understanding of network termination that is typically beyond the reach of a DIY enthusiast. Attempting to splice these cables manually can corrupt the signal for the entire network, leading to total instrument failure when you need it most. Reliability in digital hardware is just as important ashore as it is at sea; for those managing office infrastructure in the UAE, you can check out ZD Computer Trading LLC for specialist maintenance of printers and plotters.
Professional Diagnostic Tools
Professional technicians use specialised equipment to see what the human eye cannot. Thermal imaging cameras are particularly effective in the humid Durban climate, as they allow us to identify high-resistance hotspots in wiring looms before they melt or catch fire. If a terminal is glowing under an infrared lens, it is a clear sign of internal corrosion or a poor crimp that needs immediate attention.
We also utilise advanced load testers to determine the actual Cold Cranking Amps (CCA) available in your battery bank, rather than just the resting voltage. For owners of modern outboards, computerised engine diagnostics are essential. As certified Yamaha and Suzuki technicians, we can plug into your engine’s Electronic Control Unit (ECU) to pinpoint electrical faults within the ignition or charging systems that would be impossible to find through manual testing alone.
DIY vs. Professional Service
There is a clear distinction between replacing a blown fuse and addressing the reason why that fuse blew in the first place. If a circuit breaker trips repeatedly, it is a warning that the system is overloaded or shorting. Ignoring this symptom or installing a larger fuse is a dangerous mistake that can lead to catastrophic hull damage. Utilising marine technical services ensures that repairs are not just functional, but compliant with SAMSA safety standards for your annual COF survey.
Professional fault reports are also a vital requirement for insurance claims. If your vessel suffers electrical damage due to a lightning strike or a power surge, most insurers will require a documented diagnostic report from a qualified facility before approving repairs. By choosing professional electrical wiring and fault diagnostics, you protect your warranty, your insurance standing, and most importantly, the lives of everyone on board.
Preventative Maintenance for Electrical Reliability
The most effective way to manage an electrical failure is to ensure it never happens. Whilst the coastal conditions in Durban are relentless, a proactive approach to maintenance can extend the life of your vessel’s systems by years. By treating your wiring with the same level of care as your outboard, you reduce the likelihood of being caught out by a dead battery or a failing navigation suite during a trip. Integrating a thorough electrical inspection into your regular marine engine servicing schedule is the best way to catch minor corrosion before it becomes a major fault.
Reliability starts with the quality of the materials used. You should always insist on marine-grade tinned copper wire, which resists the “green death” of internal oxidation far better than standard copper. Every connection must be sealed with adhesive-lined heat-shrink connectors to create a truly airtight barrier. For exposed terminals on battery posts or bus bars, applying a thin layer of dielectric grease or a specialised corrosion inhibitor will prevent salt mist from bridging the gap between terminals and causing a slow discharge.
Environmental Protection Strategies
Salt air is a constant threat to the sensitive circuit boards inside your helm instruments. Whenever possible, seal the rear of instrument clusters and use protective covers when the boat is not in use. One of the most effective ways to slow down the rate of electrical decay is through secure indoor boat storage. By keeping your vessel in a controlled environment away from the direct salt spray and humidity of the harbour, you significantly reduce the atmospheric moisture that drives terminal corrosion.
Battery health also depends on consistent care during the off-season. Lead-acid and AGM batteries naturally discharge over time; if left at a low state of charge, they suffer from sulphation, which permanently reduces their capacity. Use a high-quality smart charger to maintain a float voltage when the boat is stored. This simple step ensures that when you finally head out, your batteries have the cold cranking amps required to start your engines without hesitation. Similarly, for those who enjoy land-based adventures, LeisureVan Service Solutions provides specialist mobile maintenance to ensure your motorhome or caravan is always ready for the road.
Installation Best Practices
The way your wiring is routed determines how easily you can perform marine electrical fault finding in the future. Cables should be secured high in the gunwales, away from the bilge or any areas where standing water might collect. Use cable ties and mounting bases to prevent the loom from sagging or chafing against the hull. A well-organised system is much easier to diagnose; take the time to label both ends of every wire using waterproof heat-shrink labels so you aren’t left guessing which circuit is which during a crisis.
Poorly executed DIY work is the leading cause of electrical fires at sea. Investing in professional marine electronics installation prevents nearly 90 per cent of future faults by ensuring that wire gauges are correctly calculated for the load and that every connection is mechanically sound. A professional installation doesn’t just look better; it provides the peace of mind that your vessel is built to withstand the unique challenges of the South African coastline.
Securing Your Vessel’s Electrical Integrity
Maintaining a reliable electrical system is an ongoing commitment to protection and preventative care. By understanding how the specific coastal conditions of KwaZulu-Natal impact your wiring and mastering the basics of marine electrical fault finding, you can identify most issues before they compromise your safety. While a methodical visual audit often reveals simple loose connections, remember that complex NMEA 2000 networks and high-current starter circuits require specialised expertise to ensure long-term reliability and SAMSA compliance.
Our certified Yamaha and Suzuki technicians provide comprehensive technical services, from precision diagnostics to full system refurbishments. We act as a safe pair of hands, ensuring your high-value assets are maintained to the highest regulatory standards. Contact Compass Marine for expert electrical fault diagnostics and repairs to give yourself total peace of mind on the water. With a well-maintained electrical system, you can focus on the enjoyment of the maritime lifestyle, knowing your vessel is as dependable as it is capable.
Frequently Asked Questions
Is it safe to jump-start a marine engine from a car?
It is generally unsafe to jump-start your boat from a running car because the high-output alternator in a modern vehicle can produce voltage spikes that fry sensitive marine electronics. If you find yourself stranded, the safer option is to use a dedicated portable jump pack or to connect a spare marine battery in parallel. Always ensure your GPS and fish finder are switched off before attempting the start to protect their internal circuits from sudden surges.
How do I know if my boat has a grounding problem?
Grounding issues typically manifest as erratic “ghost” faults, such as a fish finder rebooting when you activate the trim or persistent static on your VHF radio. If multiple unrelated accessories act up simultaneously, it indicates a compromised common ground. During marine electrical fault finding, we often find that the primary negative bus bar or the engine block ground connection has loosened or developed a layer of salt crust that prevents a clean return path for the current.
How often should I inspect my boat’s electrical wiring?
You should perform a comprehensive visual audit at least once a year, ideally alongside your annual engine servicing. For vessels kept in the Durban harbour or those used frequently in heavy spray, a bi-annual check of the battery terminals and bilge pump wiring is a better standard. Regular inspections allow you to spot green verdigris on terminals or brittle insulation before these minor issues lead to a total power failure whilst you are offshore.
What are the signs of a failing marine alternator?
A failing alternator usually shows as a low voltage reading on your helm gauge whilst the engine is running, typically staying below 13.2V. You may also notice that your electronics freeze during engine idling or that your cabin lights brighten significantly only when you increase the throttle. A high-pitched whining noise from the engine bay is another physical indicator that an internal bearing or a diode within the alternator is reaching the end of its functional life.